Showing posts with label crafts. Show all posts

DIY Home Fragrance: How to Make Your Own Reed Diffusers

It’s clear to see why the home fragrance industry reels in big bucks every year.  Who doesn’t love a good smelling home? Real estate experts even claim the smell of your la casa can increase or decrease the value of your property.  What can I say? We love our scents! I have to admit though it pains me to see how pricey candles and reed diffusers can be sometimes.  Plus, nowadays you hear so much about how these chemical-based air fresheners aren’t good for the earth or us anyways. The great news is making your own reed diffuser is so easy and you don’t have to go broke doing it!


Supplies
Diffuser reeds {I found mine at Michael’s}
1 small container or vase
Essential oils from any local health food or craft store
½ cup of water
Vodka {Disclaimer: No crafts were harmed in the making of this project - as far as the crafter…. that’s another story}


Directions
Mix 4-5 drops of your essential oil into the half-cup of water. Add 2 drops of vodka to the water. The vodka serves as an emulsifier and helps keep the water and oil mixed.  Pour the mix into your container and add your reeds.  Similiar to the store bought diffusers it does take a few days for the reeds to absorb the oil and release its scent.  Flip reeds every now and then to refresh your fragrance.


The fun part about making your own reed diffuser is that there are a variety of scents you can create from essential oils by mixing and matching.  I happen to use a Bergamot and Yuzi Fruit oil found at Michael’s that is both citrus and summery. To top it off since I already had the vase at home this puppy only cost me $4 to put together and there’s still tons of leftover oil for future refills or extra diffusers for other rooms.


What's your favorite way to keep your home fresh and good smelling?


Linking here:
http://www.skiptomylou.org/
http://www.dittledattle.blogspot.com/
http://www.thegirlcreative.com/
http://tipjunkie.com/
http://www.sugarbeecrafts.com/
http://www.bluecricketdesign.net/
http://somedaycrafts.blogspot.com/

Summer reading list for kids

We have a few more summer reading lists, but for kids today!  We have an idea for a couple different ages.

Left: elementary, center: toddler, right: preschooler


I bought this dilapidated copy of Green Eggs and Ham at the Goodwill.  And before you freak out that I cut it all up and stamped on it, I promise it was missing several pages smack dab in the middle!  This one was a gift, so I didn't write any titles down, but you get the jist, right?  I made the banner from pages in the book.


This next one is more of an elementary school version.  This book was also from Goodwill, but it was intact so I wanted to make a version that didn't destroy the book.


I photocopied an illustration and then cut it smaller...


I put a title and and large circles on the illustration and then added the titles to the circles.  I used a clothespin to hold the sheet to the cover, but there shouldn't be any damage to the book.  I thought it might make a fun end of the year gift for classmates!


The final one (I know, this isn't in any order that makes sense!) is the toddler reading list that basically just for decoration.  Not that it hurts to have some titles in mind, I guess.  I already had this cute little book, but it was torn to shreds.

I cut out the broken animal pop-up pieces to use for the titles.

Then glued them to a piece of twine with hot glue.

Here's a few of the pieces I used.


If you don't already have a big list of summer reading for your kids, here's a few sites with recommendations.
http://www.scholastic.com/parents/books-and-reading/book-lists/
http://www.scholastic.com/resources/booklist/page-turning-tales-of-summer-vacation/
http://www.scholastic.com/resources/booklist/great-summer-reads-for-your-middle-schooler/
http://printables.scholastic.com/content/collateral_resources/pdf/11/SCBookListYA2011_009.pdf


Pin It
Linking here:
Sunday:
http://iheartnaptime.blogspot.com/, http://niftythriftythings.blogspot.com/
Monday:
http://craftomaniac.blogspot.com/, http://makingtheworldcuter.blogspot.com/, http://diyhshp.blogspot.com/, http://www.skiptomylou.org/, http://sumossweetstuff.blogspot.com/, http://marvelouslymessy.blogspot.com/
Tuesday:
http://todayscreativeblog.net/, http://ladybug-blessings.com/, http://tipjunkie.com/, http://www.sugarbeecrafts.com/, 
Wednesday:
http://eisymorgan.blogspot.com/, http://www.paisleypassions.blogspot.com/, http://somedaycrafts.blogspot.com/, http://www.bluecricketdesign.net/, http://www.mybackyardeden.com/, http://reasonstoskipthehousework.blogspot.com/
Thursday:
http://www.momnivores-dilemma.com/,  http://www.houseofhepworths.com/, http://nightowlcrafting.blogspot.com/
Friday:
http://www.whipperberry.com/, http://www.thegirlcreative.com/,http://tidymom.net/, http://sassysites.blogspot.com/, http://shabbynest.blogspot.com/, http://tatertotsandjello.blogspot.com/, http://www.findingfabulousblog.com/
Saturday:
http://www.bedifferentactnormal.com

Summer Reading Lists

All the end of the school year stuff has kept us (and lots of the blogosphere!) hopping with events and teacher gifts and graduations.  I, for one, start to dream of long lazy summer days pool side with a book beside me!  Most kids are being sent home with some kind of summer reading list too!  But do we just scan through the local bookstore?  Nope.  The Holiday Snobs have to turn our summer reading lists into a keepsake that looks good on a shelf!  So we thought we'd share our snobby versions!  Today we have teen (girl most likely) and Adult!  And if you know a father who's a reader, maybe it'd make a good gift idea along with a new book?

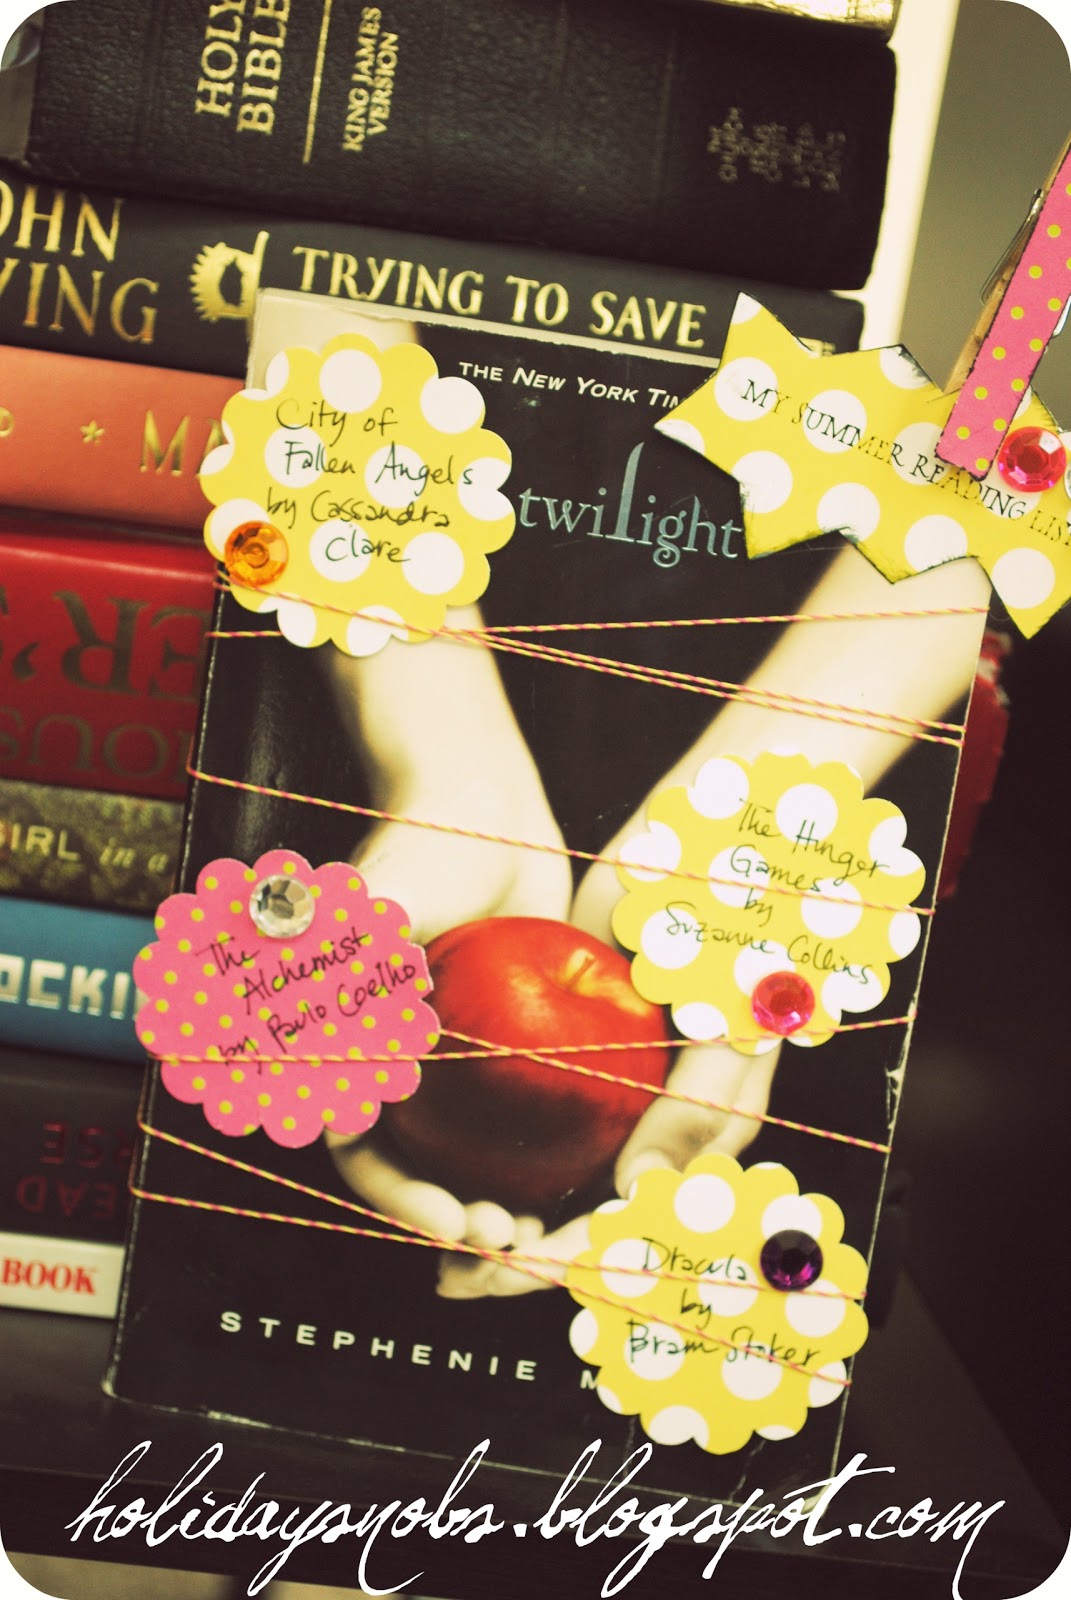
For the teen version, I wrapped my favorite teen novel (not necessarily, but does anything say "teen" like a copy of "Twilight"???) with hot pink and yellow twine and stuck in these scalloped circles.  I wrote three titles down from a recommended reading list and embellished the circles with some fun rhinestones.   I used an embellished clothespin to attach the label so the book is completely unscathed. 

For the Adult Summer Reading List, I made a 5x7 image on picnik just to have a clear template.  It's not really very special, but I already did the work, so I might as well share it!  Just save the image to your computer if you want to use it, and let us know!

I decided to display the list with a book redo that was inspired by a post I saw on Knock Off Decor.   Jessica at Running with Scissors had seen these old books bundled by Ballard designs and copied them with some old paper backs.  I used a couple of hardcovers from the Dollar Store and ripped the spines off, then bundled with twine. 


I LOVE how they turned out!  I promise they look even better in person!  And for 2 bucks?  Pretty cheap for a different decoration. 


We'll post our kid versions tomorrow, you'll love 'em!!
You can go to the TeenReads.com site here to view the teen reading list.

Linking here:
Sunday:
http://iheartnaptime.blogspot.com/, http://niftythriftythings.blogspot.com/
Monday:
http://craftomaniac.blogspot.com/, http://makingtheworldcuter.blogspot.com/, http://diyhshp.blogspot.com/, http://www.skiptomylou.org/, http://sumossweetstuff.blogspot.com/, http://marvelouslymessy.blogspot.com/
Tuesday:
http://todayscreativeblog.net/, http://ladybug-blessings.com/, http://tipjunkie.com/, http://www.sugarbeecrafts.com/, 
Wednesday:
http://eisymorgan.blogspot.com/, http://www.paisleypassions.blogspot.com/, http://somedaycrafts.blogspot.com/, http://www.bluecricketdesign.net/, http://www.mybackyardeden.com/, http://reasonstoskipthehousework.blogspot.com/
Thursday:
http://www.momnivores-dilemma.com/,  http://www.houseofhepworths.com/, http://nightowlcrafting.blogspot.com/
Friday:
http://www.whipperberry.com/, http://www.thegirlcreative.com/,http://tidymom.net/, http://sassysites.blogspot.com/, http://shabbynest.blogspot.com/, http://tatertotsandjello.blogspot.com/, http://www.findingfabulousblog.com/
Saturday:
http://www.bedifferentactnormal.com

Pin It


Retro Father's Day Printables

I’m pretty convinced that the black hole in my dryer that chooses to eat our socks is the same hole that consumes “time”. Seriously, can you believe it is going on June already? That being said, it’s time to start thinking about Father’s Day and what to get good ol’ POPS! I’d thought it would be fun to design a printable to share. All you need to do is add some of these retro inspired soda labels to a few vintage pop bottles and you’ve got one groovy gift for daddy-o! {Okay seriously, how did people in the 50’s and 60’s take each other seriously talking like this?}


 Download labels here. You can print them on plain or self-adhesive paper.  There are 4 labels on each sheet and the labels are 3.5 x 5 inches in size, which should cover most average 12 ounce soda bottles.

Cut your labels and adhere to the glass bottle {You can remove the retail label with Goo Gone or do what I did and just place the retro labels right over them}. If you used regular paper instead of the self-adhesive paper you can adhere the label with double-sided tape.


Toss the soda bottles in a gift basket and make this present a little suh-weeter by adding some of Pops favorite retro candy treats.  You can continue to play on the dad theme by throwing in some Pop Rocks, Sugar Daddies, and Tootsie Pop suckers! Dad doesn’t have a sweet tooth? No problem, tie a gift card from his favorite hardware store or coffee shop onto the neck of the soda bottle.


Here are some of my favorite spots to pick up vintage soda:

World Market
Target
Whole Foods

I'd love to hear if you use these for your Pops or hubby!


Birthday blocks tutorial


Okay, finally getting a chance to post about our last Craft Night, even as we have May's Craft Night happening soon!  We don't quite have a picture for EVERY step and all these were taken at night, so please forgive the quality!

1.  First you'll need about 80 inches of ruffled crepe paper.  We just fed the streamers through the sewing machine, ruffling manually.  


2.  We made the cake stands by using Gorilla Glue to attach a glass candlestick to a plate.  We Modge-podged paper onto the plate, but didn't include a picture of that.


3.  Next, use hot glue to attach crepe paper around the outside of the plate.  It will cover any uneven cutting of the paper :)

4.  For the blocks we used a 4x4x8 piece of wood, and then cut it into an 8" long rectangle, 6" rectangle and a 3.5" square for the top and painted them white.


5.  For the middle block, we covered it in two lines of ruffled streamers.  Use hot glue to make a line, then press the sewn middle of the streamer into the line of glue.  Wrap around all four sides.  Then repeat for a second layer of ruffles.


6.  The square and 8" rectangle were covered in paper.  For the square you'll need 6 different patterns, cut into 3.25" x 3.25" squares.  For the rectangle you'll only need two long pieces, 7.75"x 3.25", and two squares, 3.25" x 3.25"  The bottom of the block won't ever show and the top of the block is mostly covered by the ruffled rectangle above it.

7.  Mod-podge the paper on.

Here's a picture of the blocks finished through these steps so far:


Here's a picture of the Craft Night kits set up and ready to go.  (Which, by the way, we will be putting onto our etsy shop in addition to the finished sets.)


10.  We added vinyl to the bottom and top pieces of wood. We cut "days until my" in Simply Sweet at 1" and "Birthday!" in 1.5".   Then we cut numbers 0-5 in 3 inches


This set was made by Glitta's sister, isn't it cute??


And here's some pix of some of the crafters.  All the sets turned out so cute and we had so much fun!  Thanks ladies for indulging our snobbery!


Linking here:
Sunday:
Monday:
Tuesday:
Wednesday:
Thursday:
Friday:
Saturday:

Mail your Gift Card in an Altoid tin!

Just after Easter, I saw this cute idea on Cricket's Dashboard where she mailed filled plastic eggs to her nieces and nephews.  But not wrapped, just how they are!  I love it!!  And have been thinking of a way to do something like it without waiting until next year!


Cricket's Dashboard
Then I thought of the Altoid containers, like the one Alpha Mom made here!  She used hers for nuts and bolts with a tool case, but I know I've seen them as gift card holders floating around blogdom!


AlphaMom


So I made one for my MIL who lives out of state!  A gift card was looking like the most likely present...  And I'm going to just tape it up and mail it as is!


If you don't know how to make one of these snobby little gift card holders, it's so easy. Empty an Altoids tin and wipe it out.

The gift card JUST fits inside.


Then I made a little card to place inside.  I layered shredded paper, then the Mimi's Cafe card, then my card.  As you can see from the below picture, I also cut paper to fit the inside lid.  I don't have a picture, but I did it for the bottom of the box too.  Modge Podge worked fabulously to apply it.


I made the top card to act exactly as the label and I'm mailing it out tomorrow, so I'll let you know what it costs.  (But I can't imagine it'll be more than a couple dollars.)


But. 

That's not all!

We have a Mother's Day gift for you too!


This giveaway is open to everyone who is a Mother, or just came from a Mother at some point :)

Giveaway closes at midnight, MST, Thursday, May 5th, 2011

To Enter:

1. Become a follower of this blog and leave a comment.

2.  If you're already a follower, leave a comment that you are.

3.  "Like" us on Facebook and leave a comment that you did.

So you have two chances to enter this contest for a $50 gift card to Target!  How awesome is that!  Thanks to our sponsor, Craft Night.

*this giveaway is closed, but thanks for all your awesome comments!

Monday:
Tuesday:
Wednesday:
Thursday:
Friday:
Saturday: