Showing posts with label boys party. Show all posts

{ Spring Party Week } - Bug Out Bug Party!

Let's face it.... all the cute parties are for girls. If you've got boys, well, it's pretty much Transformers and Spongebob and "cute" turns commercial in the blink of an eye. Ah, but occasionally.... if you dig really deep in the party blogs, you can find a "Wow-za" kind of birthday party -- yes, even for boys. And this great party from Joanne of Oh Goodie Designs is one of those kinds of parties.

Joanne worked on a bug theme for her client's son, Tate, who was turning six -- a perfect party theme for boys, but fun for the girls who are invited, too. And somehow, even with rainy, bad weather outside, she managed to throw a great party filled with fun. The kids had a ball with all of Joanne's ideas for "bug-gy" party activities and her table full of creatively named garden food.


Photobucket

Joanne used printables by Pen and Paper Flowers to help carry out the Bug Theme. From water bottle labels to straw embellishments, cupcake toppers and buggy food labels, the party printables are a terrific and easy way to set the tone for your party.

I love her tissue paper party poms, too. They are simple to make -- quick, too --
and make quite a big statement for a little price.

Joanne had her favorite face painter come and paint the kids' faces and hands with all sorts of bugs.... spiders, lady bugs, bumble bees, and more. This party activity is always a fun one for kids..... nothing says fun better than a GIANT bug on your face!


Photobucket

Each guest received a little bug holder box for keeping their bugs safe after catching them all over the house with their $1 bug nets that Joanne found at Target (the Dollar Tree usually carries these as well).

The kids also took home some cute insect silly bands and, my favorite, a mason jar bug light filled with shredded green paper, some plastic bugs and a glow in the dark necklace. What a fantastic idea! You could even turn this one into a craft at the party and have the kids make their own bug lights.


Photobucket

Oreo "dirt" cupcakes add a great touch to the buggy food table. I especially love all of Joanne's creative ideas for food names: Honey Bites (Bit 'o Honey), Beetle Bugs (M&Ms), Ants on a Log (chocolate covered pretzels), Worm Holes (powdered donuts), Caterpillar Pop (popcorn), Dragon Snaps (candied colored popcorn), Bug Bites (bug gummies), Rolly Pollies (Milk Duds), and Worms (gummy worms).

Joanne made another party activity by drawing an empty bug jar on paper and making multiple copies for the kids. Each child then used bug stickers and crayons to decorate their own bug jars and fill them full of insects.

And the look on Tate's face says it all..... "This was the best bug party ever!" Joanne has more photos and details on her blog, so be sure to head on over if you've got the bug party itch!
Photobucket

NEW Football Party Printables

With all the holiday hoopla I haven't had a chance to feature a football party I styled for a little six year old boy this past month. Living in Auburn with a #1 football team this season has been great fun, and it's no wonder this little Tiger fan wanted to celebrate his special day "War Eagle" style. Melissa, his mom, was wonderful to work with. I think she's got it all down pat -- with 4 boys ranging in age from 3 to 9, this lady has had lots of experience with birthday parties!

We made a fun dessert table and lots of football themed printables to go with it.... cupcake toppers, pennant banners, water bottle labels, favor tags and more. And yes, just in case your wondering, the printables are in my Etsy shop now and best of all, you can CHOOSE YOUR OWN TEAM COLORS! Believe it or not, I made this entire table for less than $100!


Photobucket

The dessert table was styled with gameday fun in mind -- a little astroturf for a tablecloth, a few pennants, team colors and of course, the field goal post. Using PVC pipe from the plumbing section of the hardware store, I made the goal post to display the birthday boy's name. After creating the post from pvc, I put a little hot glue on all the fittings to make sure they would stay in place, and then I painted the whole thing bright yellow with spray paint. I used a Dollar Tree trash can in white with some plaster of paris to secure the goal post in place. After the plaster dried, I cut a small piece of the astroturf to cover the plaster.

The letters for Chap's name were purchased at Hobby Lobby. They were the chipboard capital letters sold in the scrapbook section. I then printed out 4 sheets of the polka dot papers that come with the Team Colors Football printable collection, and traced a letter onto each sheet, alternating colors. Next I cut the letters out and used some Elmer's glue to adhere the paper to the letter. The number 6 also came from Hobby Lobby but was found in the paper machie box section.

I used megaphones and foam footballs, also from the Dollar Tree, to create the cupcake stand centerpieces. I covered them in 12"x12" scrapbook paper (which didn't completely cover the back, but you could piece it together to cover or you could just leave the back unfinished) and then used blue and white polka dot ribbon (Hobby Lobby) to finish off each end of the megaphone.

The cupcake stands were made from boxes covered in a football-leather looking fabric that I purchased at Hancock Fabrics. I then cut a piece of astroturf (Home Depot) to fit the top and added an orange and white polka dot ribbon (Hobby Lobby) for some color.

And the backdrop was made by covering a 4'x4' board with a $4.00 navy blue sheet from Walmart. Easy peasy and inexpensive, too!


Photobucket

The rest of the party table features more of the Team Colors Football printables.... cupcake toppers in 4 designs (2 of which you can add your own text), football-look cupcake wraps, 2 colors of toothpick pennant flags, larger striped pennant flags in 2 colors, polka dot water bottle wraps with personalization of the birthday child's age, favor tags with name personalization, and I also used the striped papers from the collection to cover plain white snack boxes that I purchased from the Dollar Tree (wedding section).


Photobucket

The boys had great fun wearing their team jerseys and especially playing football on the "real football field" that Chap's dad painted while they were at school that day. My absolute favorite part of the day was seeing Chap's face when he came home from school and saw his backyard turned into an Auburn gameday field. How fun is that??

The Team Colors Collection is in the shop now and features your choice of two team colors. And great news -- there are lots more items in the collection not featured here like food label cards, signs, napkin wraps, and football cut outs. Use the printables for college teams, pro teams, or even your child's own football team. It's great for birthday parties, but could also be used for end-of-season pee wee football parties or even tailgates. And there's a listing for an invitation and thank you note, too.

I hope Chap's party brings some inspiration for your next football fun day! And if you'd like to see more photos from the party, I've posted lots on FACEBOOK HERE.


Photobucket

Adorable Art Party!

I've been so excited to share this amazing art party with all of you. And when I say amazing, I mean AMAZING! Art parties have such a special place in my heart. I truly believe there is nothing much better to occupy a child than a crayon and a piece of paper. Imaginations soar if you just give them the chance!

While I've been developing Shindig over the course of the year, I've been grabbing all the cute art-related items I could find in hopes of one day adding a craft-filled art party to the Shindig line up. So you can imagine how my heart went pitter-patter when I saw this fabulous creation from Judy at Cutest Little Things .

Using one of my favorite quotes from Picasso to inspire her, "Every child is an artist. The problem is how to remain an artist once he grows up," Judy created her own masterpiece of a party. Enjoy all of the details.... the love that went into this creation for her 4 year old baby. The lollipop sugar cookies, the art palette cookies, the adorable craft for the kids to take home with them -- I LOVE IT ALL!

Just take a look.....


Photobucket


Photobucket


Photobucket

Thanks so much, Judy, for inspiring all of us!
If you'd like to see even more of this fabulously creative party,
make sure to visit Judy at The Cutest Little Things.
Photobucket

Star Wars: Party Details

My son, in no uncertain terms, decided that he was going to have a Star Wars party for his 5th birthday. Starting a birthday party business right now, I guess you'd think I'd be OK with that, but I tried and tried to talk him out of it. You see, Star Wars was not a theme I had chosen for Shindig, and I was neck-deep in projects for other themed parties. Couldn't it just be a pirate party? A cowboy hoedown? Plllllleeeeeeease? But nope....... Star Wars. Only Star Wars.

Not being very "into" Star Wars myself, (I am a 40 year old woman after all!), I had to dig in..... DEEP...... to find some inspiration. I spent countless hours googling..... soaking it all in until, well, I too knew all the characters from Super Battle Droids to Darth Sidious!

So here are the details for all of you who have been asking..... my new "Party People." I love you all, and still can not believe there are so many of you out there as obsessed as I am with throwing beautifully decorated parties.

The invitation...... I scoured the internet for inspiration for the invitation and this is what I ended up with. I used the lego bricks for a frame and the lego Star Wars characters to let all the guests know right from the start that this was no ordinary Star Wars party -- it was a LEGO Star Wars Party.


The tablescape:

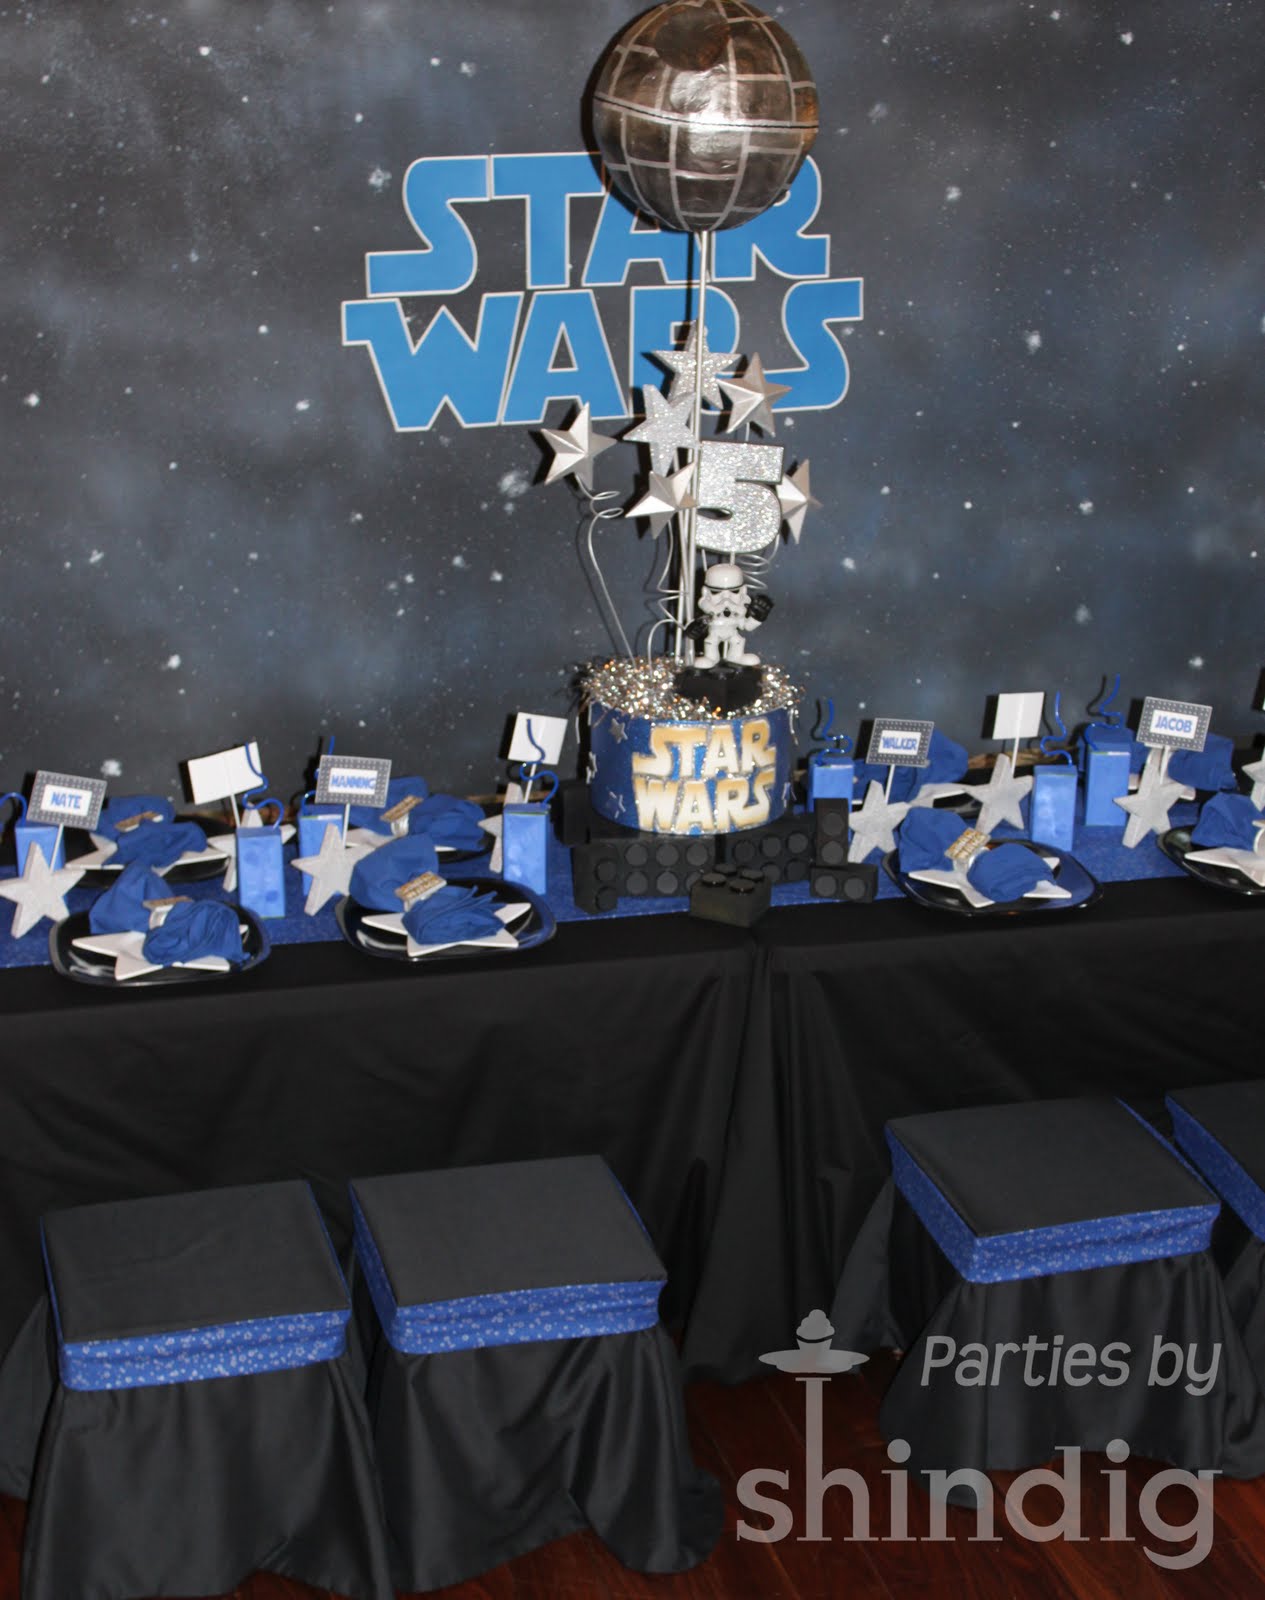
I didn't want to do the same old "Star Wars" party that you see mass-marketed in Party City. No chintzy cardboard printed-on characters here! I wanted to design it as stylishly as possible, but still give the boys the characters and the galactic space look they love. I decided on a color scheme, and then found a blue and silver star printed fabric at Hobby Lobby that I made the table runners and stool sashes out of. I took some ideas from various places on the internet for the Yoda Soda (lime sherbert and Sprite), the Light Sabers (chocolate covered pretzel sticks) and the Wookie Cookies (chocolate chip cookies stacked beside a Chewbacca character). I used different sized black candle holders for the food stands, and metallic silver plates with silver tinsel for the food displays.


The cups for the Yoda Soda were clear, plastic cups with rims brushed in corn syrup and dipped in green pop-rocks candy. The straws were actually glow in the dark from Walmart. The light saber decorations were toys that I bought and painted with metallic silver and blue-ish/green paint. I then fastened them into a wooden plaque that I painted with the silver metallic paint and embellished with silver styrofoam stars, surrounded by tinsel stars that I found at Party City.


The Yoda Soda


The Light Sabers and the Death Star Donuts (which were powdered sugar donut holes). I also served Padawan Pizza (which were cheese pizza bagel bites).


I used homemade almond buttercream frosting tinted in a nice shade of "galactic gray" for my white chocolate wedding cake cupcakes. They were YUMMY! I wanted to use the characters in some fashion, but still make them as tasteful as possible. This is what I came up with: blue glittery scrapbook paper cut into a diamond shape for the background piece with a black scrapbook piece on top. I then found different images of the Star Wars lego characters on the internet and used Photoshop to get them all the same size. I printed them out on cardstock, cut them out and glued them onto the cupcake topper. I used aluminum foil cupcake papers and spread out some silver tinsel onto a silver metallic charger plate.

The cake should be an entire post unto itself........ it took me 3 whole days!! Professional cake maker and decorator I AM NOT! But it does go to show that with..... (1) a good photo of a cake you like ...... (2) the internet (for Googling your mistakes and how to fix them!)....... and (3) some pretty dogg-ed determination, just about any of us can work with fondant and make a show-stopper. Well, only if you're experienced in the fine art of creating with playdough.
Seriously, it's a very similar process!

I'll try not to go into too much detail, but it went like this: I made an 8" and a 10" 2-layer cake, and then I covered them with buttercream frosting. I made my fondant (marshmallow, of course, for better taste) and colored it in.... oh..... I don't know...... 10,000 or so colors! No, really, probably 10-12, but it sure seemed like a lot at the time. I used gel paste food coloring for depth of color and kneaded it, and kneaded it, and kneaded it......
....... and kneaded it until the color was completely mixed in.

Then I made each of the lego Star Wars characters..... Yoda, Darth Vader, Hans Solo, a Storm Trooper and Luke Skywalker. You cannot even imagine how happy THAT made my birthday boy! (I think he went and looked at them every 10 minutes for days on end.) Then I made his name and the number 5 from cookie cutters, the Star Wars logo sign, the light sabers, the Death Star, and then the lego bricks and stars -- all out of fondant. Oh, I almost forgot, I painted everything with edible metallic dust, too. 3 days I tell you!

But, again, soooooo worth it for the sense of accomplishment and the look on that little boy's face.


I used black tablecloths, and sewed 12 black fabric covers for the stools. To dress them up, I added a sash of the same blue and silver star fabric on the table runner. I used a 4x8 piece of luan that I painted to look like space for a backdrop. Then I used my Cricut to create the Star Wars logo.


The centerpiece:
After much, much deliberation, I finally decided on a Death Star centerpiece. I used a ball pinata, took all the extra fluffy crepe paper off, and paper machied it again with newspaper to make it smoother. I cut out a circle, inverted it, taped it back in the ball to create the Super Laser, and then covered it, too, with newspaper paper machie. After it dried, I painted it metallic black and silver to resemble the Death Star.

I created large, black legos from old foam blocks my children weren't playing with anymore. I spray painted them black, hot-glued black checkers on them to create the lego "knobs" and covered the checkers with a punched-out black circle of cardstock. I used paper machie stars painted silver and a number "5" I made from glittery scrapbook paper.

The place settings:
I used black melamine dinner plates with white star dessert plates at each place setting..... blue linen napkins in a silver napkin ring I made from wood pieces (Hobby Lobby) and decoupaged with the Star Wars Logo. The placecards were designed in Photoshop and placed in a silver glittered star I bought in the Target $1 section. The juices boxes were covered with blue paper, and I punched small blue circles out and taped them to the juice boxes to make them look like a lego brick.


The Jedi robes.... I made 12!!!!! Well, actually 13 (a big one for Luke Skywalker, too!) All I can say is I'm really glad THAT part is over -- but the end result was worth all the work. Sewing is one of those things that is so time-consuming, it's hard for me to enjoy but I do it anyway to save a little money (well, maybe ALOT), and I guess for that "I did it!" feeling. I used the tutorial here for the basic design.


I thought it would be fun for each of the boys to get a name tag necklace with their Jedi robes. I designed these in Photoshop.... name on the front..... tasks on the back. Each time the boys completed a task, they earned a silver star sticker.


And a scavenger hunt is ALWAYS a hit at kids' parties, so I went shopping to find lots of theme-related items. I decided on pop-rocks, yo-yo's, frisbees, a blaster gun and a disc shooter -- all that I made a little more Star Wars-ish with stickers. I designed a Scavenger Hunt card with photos of the items they would be finding since most of the boys were 5 and weren't too proficient with their reading skills. I gave them each a bag with his name on it, and said, "Go for it!" They ran around like crazy finding all of the items that they put in their bags and then got to take home with them.


Here is the Star Wars Lego character Bingo Game I designed for the boys to play at the end of the party. I thought it might be a good idea to have a little "settling down" activity before their mama's came to pick them up. They all loved it, and were excited to win a few extra "prizes" like stickers, rings, and glow in the dark necklaces.


The goodie bag....... I bought blue paper sacks and punched blue circles from cardstock to make them into lego bricks. I designed the thank you card and attached it with curling ribbon.


I downloaded coloring book images from the internet and made a coloring book for each of the boys' goodie bags. I also bought some silicone molds in lego shapes and lego character shapes and chopped up crayons to melt in them. They were really cute, but very time-consuming, so I don't think I'll be doing that project again for a loooong time!


I have to say, not starting out as a Star Wars kind of girl, I was really happy with the end result. Best of all, at the end of the party when a mom came to pick up her little boy who was a guest, my son Jacob answered the door and screamed,
"This was the BEST DAY OF MY LIFE!"
I guess you can't ask for much more than that! If you'd like to see more pictures from the actual party, click here.
UPDATE: As of October 1, 2010, I have started added Star Wars Printables to my new Etsy.com shop for Party Printables. There has been such wonderful response to this little party, that I am happy to say, the printables are ALMOST all ready to go! I will be adding Star Wars Lego invitations, thank you notes, 2" party logos to use for cupcake toppers and so much more, Star Wars signs, personalized water bottle labels, napkin wraps, favor tags, bingo game cards, and more! If you'd like to check it out just click HERE .
-- I'd love to customize a Star Wars party just for your little boy!!

Photobucket

I love a Shindig!


Well, after many months of trying to balance a new business with my full-time job of "Mommy," I'm feeling a little more accomplished these days. That completely due to alot of earrrrly mornings and quite a few late nights. Another party down.... another party ready for Shindig. Summer's been awesome.... but maybe just a little bit more difficult than I expected trying to work with the kids being home all day. I absolutely love them being out of school..... no time-crunched schedules although we have stayed really busy. I'm beginning to think that with three kids, there's never gonna be a "not so busy" time, but it sure has been nice to take a break from the after school activities and the homework.
I'll post later on the details of the food and the food table and more about how the activities went at the party. I'm getting quite a few hits from people interested in parties and maybe I can help someone else planning a Star Wars party for their sweet little obsessed Star Wars fanatic. I know how much I learn from the talented moms and party planners out there.
Meanwhile, I've got a new slideshow of the party up on my Phanfare slideshow site.
Click on the link below to check it out sometime.


Photobucket

Star Wars Birthday Party

Hi, I'm Jacob and I love Star Wars. I love it so much that I talked my mom into a whole birthday party of Star Wars.... because, really.....
what else matters in life but R2D2, Chewbacca and Darth Vader anyway??

Mom had some ideas for my party.....
I had even more.
And as much as I also love legos, it couldn't just be a
regular ole Star Wars party, it had to be a Lego Star Wars party
with a Lego table to build spaceships, too.
It was really cool to have all my best friends there....

Sutton & Madison were pretty fun helpers, too
And here's one mom made us take before we all went outside.
By the way, she asked my dad...... rreeeeeeeaaal nicely..... to pretend to be a Jedi and teach us how to use our light sabers..... she even sewed him a costume to go with our Jedi robes
and, best of all, it even had real bullets!

Here we are at our official Light Saber Training,
and, of course, we were trained by none but the very best....
there he is..... Luke Skywalker himself!

Dad, AKA "Luke" worked on our fighting skills

Luke was showing us all his moves....

I know that Luke guy is supposed to be the "Master,"
but just between me and you, I DEFINITELY took him down.....

After some training, we had to prove ourselves to the Jedi Master.
Princess Leia, on the balcony above us, let go of some asteroids
for us to keep in the air using only our light sabers.....

Watch out Darth Vader.... here we come!
Now it was on to the next task. To save the galaxy,
we had to find all our supplies in the jungle

So we took off to find all six things we Jedi's would need

Oh, look, Reese found one right there.

Uh-oh, I see the Death Star ahead......

It must be killed before we are killed!!
So we went after that Death Star with all our might.

And knocked the fool out of it..... we smacked it..... we creamed it....

And we creamed it again....

After three rounds each, we Jedi's were tired. That Death Star gave us a little more than we bargained for. So thank goodness, Princess Madison took a turn....
and Whoo-hoo! She knocked it on the ground....

Then Macy tried her hand at it....

Growing a bit frustrated, Sutton came in with the big guns...
Ahhhh, Look! A big crack!

So Luke grabbed that Death Star and showed it who's boss....

And F-I-N-A-L-L-Y we scrambled for some Death Star candy!

After all that fighting it was time for a little obstacle agility test.....
Jedi's must be light on their feet to battle the Evil Empire....

So we ran through that course....

And ran.....

and we ran some more....

And we crawled through a tunnel....
and we made our way out of the tunnel...

And we tossed some rings....

and we swung over hot lava....

And, in the end, we saved Yoda from the Vader Dungeon....

After all that training it was definitely time for some Galactic Grub. We went inside
where Mom had gone a little coo-coo with the decorations...

And the food table, too..... doughnuts, ice cream, pizza.... what was she thinking??

And we celebrated my 5th birthday in style....

and we ate like kings.... Junk Food Kings, that is....

So we were happy and we smiled....

And here's the cake she made of all my favorite things

She made me some Star Wars cupcakes, too

And Macy played the Birthday Song just for me!

And then I blew out those candle with all my Jedi breath

After it was all done, we settled down to play a little
Star Wars Bingo before everyone had to go

But most of all, we had a blast with our buddies.

May the Force Be With You!
Thanks for helping me Celebrate!

Jedi Jacob
I've had lots of sweet requests to post more about this Star Wars Party, so if you'd like to see a little more about how it all came to be, check out the post HERE.

UPDATE: As of October 1, 2010 I have begun to add Star Wars Lego Party Printables to my Etsy.com shop. If like this party and some of the details, be sure to check out the new printables line. It's so easy -- and AFFORDABLE! These printables are completely customized for your birthday party and include items such as invitations, thank you notes, 2" party logos (that can be used for cupcake toppers and so much more), favor tags, water bottle labels, napkin wraps, toothpick flags, Star Wars signs and more! I will be adding more items each day this week, so if you are interested just send me a quick email to shindigparties@gmail.com.
You can find the Star Wars Lego Printables at my Etsy shop HERE.
Photobucket